Showing posts with label fish. Show all posts

Breakfast Poached Eggs with Avocado and Smoked Salmon

Breakfast Poached Eggs with 

Avocado and Smoked Salmon


The first time I tried poached eggs was this past summer when I visited 
my family in Canada. I always wanted to try making them, but it seemed
like it would turn into a kitchen disaster. Well, it did... my first attempt wasted 1/2 dozen eggs.
I'm not sure if it was because the eggs were of poor quality, or maybe I just didn't know what I was doing! Anyways, in my instructions I tried to be as clear as possible when explaining how to make these wonders. I absolutely love poached eggs now, and the avocado and salmon combination is just DELICIOUS. Who knew such a meal can be so satisfying and healthy?


What I Learned From My Mistakes When Making Poached Eggs ! ! ! MUST- READ ! ! !
  1. Buy high-quality eggs.
  2. The eggs should be fresh. 
  3. Do NOT add salt to the boiling water.
  4. Vinegar helps shape the egg, add a teaspoon to the water.
  5. Boil the water first, but do NOT place the egg directly into boiling water.
  6. The water must be hot, not boiling. 
  7. Stir the water as quickly as possible for the egg to spin and form its shape.
  8. Patience and experience will come a long way. 
  9. Do not overcook poached eggs. This is why we have another method for hard-boiled eggs.


Ingredients-

1. Smoked Salmon Slices
2. 2 Eggs
3. 1/2 Avocado
4. 1 tsp. Vinegar
5. Salt
6. Pepper
7. 1/2 tsp. Lemon Juice
8. Chopped Chives
9. Whole-Wheat Bread/Toast


Instructions- 

1. Prepare salmon slices.
2. Cut lengthwise through the entire avocado around the pit.
3. Twist avocado to receive halves. Remove pit.
4. Take one half of the avocado, and create slices lengthwise without cutting through the skin.
5. Remove thin slices and place on plate. Spread lemon juice on avocado to prevent browning.
6. Boil water in a small pot. Do NOT add salt. Add 1 teaspoon of vinegar.
7. When the water boils, quickly remove it from the heat source and spin the water vigorously.
8. Crack open one egg onto a plate and while the water is spinning, add the egg to the hot water.
9. Carefully spin the water and place the pot back onto the heat. Lower the heat.
10. The egg-white will wrap itself around the yolk.  Cook for about two minutes and remove gently.
11. Repeat the above steps for the second egg, beginners should only try to cook one egg at a time.
12. Place salmon slices onto a piece of bread, then add the egg. Decorate with avocado.
13. Season eggs with salt and pepper to taste.
14. Slice fresh chives and sprinkle over plate. Serve.


Enjoy! 

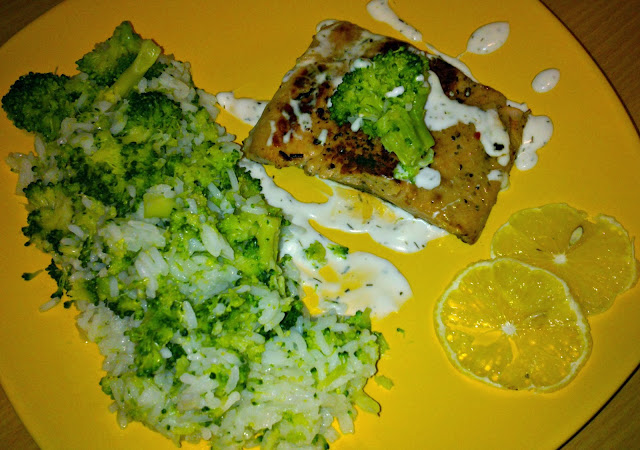
Pan-fried Salmon with Garlic-Dill Sauce and Rice & Broccoli

Pan-fried Salmon with Garlic-Dill Sauce 

and Rice & Broccoli


A delicious and healthy dinner :) 
All natural products that are high-fiber and heart-healthy


Ingredients-

1. 2 Portions of Salmon Filet
2. 200g White Rice
3. 1 Broccoli
4. 2 tsp. Soy Sauce
5. 2 tsp. Lemon Juice
6. Lemon Slices
7. Salt
8. Pepper
9. Pinch of Garlic Powder
10. Pinch of Sodium-Free Vegetable Seasoning (Dash, etc.)
11. My Recipe For Homemade Garlic Sauce
12. Handful of Fresh Dill


Instructions-

1. Prepare two portions of salmon filet. Season with salt, pepper, soy sauce, and lemon juice. Set aside.
2. Add a pinch of dried vegetables/herbs mixture onto the salmon. (optional)
3. Bring salted water to a boil. Cook broccoli to desired tenderness. Do not overcook!
4. Bring salted water to a boil and cook rice. When cooked, fluff rice with a fork.
5. Combine broccoli and rice.
6. Heat pan with vegetable oil and fry salmon skin-side first. Cook for about two minutes then flip.
7. When salmon is pink, remove from pan.
8. Finely chop fresh dill and add to prepared garlic sauce. (Click Here for my recipe!!!)
9. Cut lemon into slices and set on plate. Add a serving of rice and broccoli with salmon filet.
10. Drizzle garlic-dill sauce over plate and salmon. Serve.


Enjoy!

Salmon and Cream Cheese Wraps with Chives

Salmon and Cream Cheese Wraps with Chives


One of the simplest and quickest recipes for a delicious and healthy lunch!
The recipe makes two wraps, if you would like to make more,
increase the ingredients proportionally. It takes only minutes to prepare.


Ingredients-

1. 100g Smoked Salmon Slices*
2. 2 tbsp. Cream Cheese
3. 2 20cm Tortilla Wraps
4. 1 Handful of Freshly Chopped Chives
5. Salt and Pepper to taste
*You may also use lemon juice and squeeze a few drops on the salmon slices.

Instructions-

1. Preheat pan and warm two tortillas.
2. Spread 1 tablespoon of cream cheese on 1 tortilla. Repeat.
3. Cover the cream cheese with chopped chives.
4. Add two large slices of salmon on 1 tortilla. Repeat.
5. Add salt and pepper to taste.
6. Roll up the tortillas.
7. Slice into three with a sharp knife.
8. Serve fresh or refrigerate and serve chilled with chives.


ENJOY :)

Hoso-maki / Uramaki / Maki / Sashimi / Philadelphia Roll / California Roll / Alaska Roll

Homemade Sushi


Thank you everyone for continuing to view my blog during my monthly absence.
I am back in school now, and I am on my own and have more time for myself.
I will be posting more frequently during this period of time :)
Sushi, it is number one on my favorite foods list. I am extremely thankful
for my boyfriend's sister's husband for teaching me the art of sushi.
They received a beautiful sushi plate set for their first anniversary,
and everything turned out absolutely beautiful.
This was my first attempt at making this delicious treat, and I now know
there is nothing difficult or too expensive to make this at home!
Take a few minutes to view the delicious sushi.
Grab a friend or family member, it will take some time to
prepare all the ingredients. Making sushi with friends and family
truly brings everyone together, enjoy it and have fun!

Ingredients-

1. Sushi Rice
2. Rice Vinegar
3. Pinch of Salt
4. Sesame Seeds
5. Surimi Crab
6. Avocado
7. Cucumber
8. Cooked Shrimp (~10)
9. Fresh Salmon Slices
10. Nori
11. Chives
12. Philadelphia Cream Cheese
13. Soy Sauce
14. Wasabi
15. Pink Marinated Ginger
16. White Wine


Instructions-

*You will need a bamboo mat and a small bowl of lukewarm water to dip your hands in.

1. Prepare all ingredients. Wash cooked shrimps and dry.
2. If using fresh salmon, cut into slices. You may also buy thinly sliced salmon.
3. Slice cucumber and avocado into thin slices. Slice chives into halves.See photos above.
4. Cook sushi rice according to instructions on package. This is the key to PERFECT sushi.
5. Stir rice consistently or it will burn. When cooked, add a splash of rice vinegar. (3tbsp.)
6. Place one nori on a bamboo mat.
7. Wet your hands and grab a small portion of rice. Spread it delicately yet firmly on the nori.
8. See photos above. Spread rice evenly on entire nori.
9. Roast sesame seeds until golden brown for uramaki.

Now you are ready to chose your specialty roll.
Feel free to substitute and experiment with different types of fish.

1. Maki - Philadelphia Roll -
(traditionally with salmon)
  • Spread cream cheese lengthwise on rice.
  • Add equal slices of cucumber and avocado next to cream cheese.
  • Add salmon slices across the length of the roll.
  • Add chives as seen in above photos.
  • Firmly twist forward the bamboo mat to close the sushi roll and make it a tube shape.
  • Roll upwards gently yet firmly to give the roll it's shape.
  • Cut into 8 slices with an extra sharp knife.
2. Maki - California Roll
(traditionally with crab)
  • Add surimi/crab sticks lengthwise on rice.
  • Add cucumber and avocado.
  • Firmly twist forward the bamboo mat to close the sushi roll and make it a tube shape.
  • Roll upwards gently yet firmly to give the roll it's shape.
  • Cut into 8 slices with an extra sharp knife.
3. Maki - Alaska Roll
(traditionally with shrimp)
  • Make a cut in the shrimp for it to lay straight. It should almost be breaking apart into two.
  • Add cucumber and avocado.
  • Firmly twist forward the bamboo mat to close the sushi roll and make it a tube shape.
  • Roll upwards gently yet firmly to give the roll it's shape.
  • Cut into 8 slices with an extra sharp knife.
4. Hoso-maki - Avocado and Cucumber Roll
(thin rolls usually with vegetables)
  • Slice nori into half. These rolls will be smaller in shape and size.
  • Place avocado across the rice. You may use both or only one vegetable ingredient.
  • Be careful, this roll is usually harder to make because it is so thin.
  • Grasp it carefully with the help of the bamboo mat to form it's shape and roll.
  • Cut into thin slices.
5. Uramaki
(inside out rolls, rice on the outside covered with sesame)
  • This was tricky, but taking it one step at time will come a long way.
  • Wrap the entire bamboo mat in plastic wrap.
  • Place nori on the mat and cover entire nori with rice.
  • Cover entire rice with roasted sesame seeds.
  • Flip the roll over onto it's other side. See photos.
  • Use any fish and vegetable as described before.
  • Shrimp, avocado, cream cheese, and chives into one roll. Roll and slice.
6. Sashimi
(small pieces of sushi , small portion of rice is covered and layered by a slice of fish)
  • Take a very small portion of rice and form it into a somewhat rectangular shape.
  • Cover the rice with a layer of salmon.
  • Repeat steps until all rice is used. You may layer the rice with shrimp as well.
  • Decorate with chives. A great option is caviar, which I did not have with me.
Serve sushi slightly chilled with wasabi, soy sauce, marinated ginger, and white wine!

ENJOY! :)

Breaded Cod Filet with Young Potatoes

Breaded Cod with Young Potatoes


A classic fish recipe, I am sure many of us know how to bread filets,
and I have to say cod is one of my favorites. The white meat is so delicate,
and it's a very healthy fish, too! Delicious in flavor and great for a quick dinner,
cod served with young, small potatoes that do not need to be mashed.
For some reason, fried fish, even though I eat it all year round, reminds
me of summers spent at the beach in New Jersey.


Please subscribe to my blog via BlogLovin, just one click!

Follow on Bloglovin


Ingredients-

*2 Servings
1. Two Small Fresh Cod Filets
2. 6-7 Young Potatoes (the very small ones, in-season now)
3. Handful of Lettuce
4. ~10 Thin Red Bell Pepper slices
5. Fresh Chives, chopped
6. Plain White Flour
7. 1 Egg
8. Bread Crumbs
9. Vegetable Oil
10. Salt 
11. Pepper
12. Lemon Slices and Lemon Juice


Instructions-

1. Clean cod filets and dry. Make sure the fish is dried!
2. Add salt and pepper to taste to both sides of filet, and squeeze a few drops of lemon juice.
3. Set aside the filets. During this time, peel potatoes and start cooking them. Add salt to the water.
4. Prepare flour, breadcrumbs, and one whisked egg on separate plates.
5. First, cover filet with flour.
6. Next, place the filet in the egg.
7. Transfer the filet onto the dish with breadcrumbs. Cover entire filet with breadcrumbs. 
8. Repeat these steps with second filet.
9. Heat pan with a decent amount of vegetable oil. The oil should be hot.
10. If your cod filets are large, you may want to cut them into halves or they might break apart on the pan.
11. Place one filet at a time on the hot pan with oil. The fish should turn gold within a minute if not less.
12. Lower the heat, and flip the filet onto the other side. Continue frying until golden brown.
13. The potatoes should be cooked by now. Drain and serve with cod filets. 
14. Wash a few leaves of lettuce and slice some red bell peppers as a side. 
15. Sprinkle plate with some freshly chopped chives.


ENJOY :)

Dedicated to my Daddy, who makes the best cod, salmon, and every other fish out there! 
 

Related Posts Plugin for WordPress, Blogger...